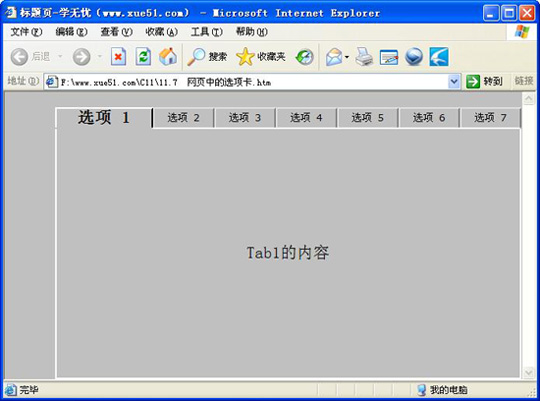
JS代码完成页面中的选项卡效果
【实例名称】
JS代码实现网页中的选项卡效果
【实例描述】
选项卡是C/S(Client/Server)应用程序中常见的控件,但网页中并无此控件。本例学习使用JavaScript和CSS实现B/S(Browser/Server)应用程序的选项卡。
【实例代码】
<html xmlns="http://www.w3.org/1999/xhtml" >
<head>
    <title>标题页-本站(www.xue51.com)</title>
<style>
.conts{visibility:hidden}
.tab{border-top:solid thin #E0E0E0;
border-right:solid thin gray;
border-left:solid thin #E0E0E0;
font-family:Verdana;
font-size:10pt;
text-align:center;
font-weight:normal}
.selTab{border-left:solid thin white;
border-top:solid thin white;
border-right:solid thin black;
font-weight:bold;
text-align:center}
.conts  {visibility:hidden}
.tab{border-top:solid thin #E0E0E0;
border-right:solid thin gray;
border-left:solid thin #E0E0E0;
font-family:Verdana;
font-size:10pt;
text-align:center;
font-weight:normal}
.selTab{border-left:solid thin white;
border-top:solid thin white;
border-right:solid thin black;
font-weight:bold;
text-align:center}
</style>
<script language="JavaScript">
function public_Labels(label1, label2, label3, label4, label5, label6, label7){
t1.innerText = label1;
t2.innerText = label2;
t3.innerText = label3;
t4.innerText = label4;
t5.innerText = label5;
t6.innerText = label6;
t7.innerText = label7;
}
//切换选项卡时显示选项卡的内容
function public_Contents(contents1, contents2,
 contents3, contents4, contents5, contents6, contents7){
t1Contents.innerHTML = contents1;
t2Contents.innerHTML = contents2;
t3Contents.innerHTML = contents3;
t4Contents.innerHTML = contents4;
t5Contents.innerHTML = contents5;
t6Contents.innerHTML = contents6;
t7Contents.innerHTML = contents7;
init();
}
//默认显示选项卡1
function init(){
tabContents.innerHTML = t1Contents.innerHTML;
}
//更换选项卡时的方法
var currentTab;
var tabBase;
var firstFlag = true;
function changeTabs(){
if(firstFlag == true){
currentTab = t1;
tabBase = t1base;
firstFlag = false;
}
//当用户单击选项卡时,修改样式及内容
if(window.event.srcElement.className == "tab")
{
currentTab.className = "tab";
tabBase.style.backgroundColor = "white";
currentTab = window.event.srcElement;
tabBaseID = currentTab.id + "base";
tabContentID = currentTab.id + "Contents";
tabBase = document.all(tabBaseID);
tabContent = document.all(tabContentID);
currentTab.className = "selTab";
tabBase.style.backgroundColor = "";
tabContents.innerHTML = tabContent.innerHTML;
}}
</script>
</head>
<body BGCOLOR="#c0c0c0" onclick="changeTabs()"
onload="init()">
<div STYLE="position:absolute; top:20; height:350;
width:500; left:65; border:none thin gray">
<table STYLE="width:600; height:350" CELLPADDING="0"
CELLSPACING="0" bgcolor="c0c0c0">
<tr><td ID="t1" CLASS="selTab" HEIGHT="25">选项 1</td>
<td ID="t2" CLASS="tab">选项 2</td>
<td ID="t3" CLASS="tab">选项 3</td>
<td ID="t4" CLASS="tab">选项 4</td>
<td ID="t5" CLASS="tab">选项 5</td>
<td ID="t6" CLASS="tab">选项 6</td>
<td ID="t7" CLASS="tab">选项 7</td>
</tr><tr>
<td ID="t1base" STYLE="height:2; border-left:solid thin white"></td>
<td ID="t2base" STYLE="height:2; background-color:white"></td>
<td ID="t3base" STYLE="height:2; background-color:white"></td>
<td ID="t4base" STYLE="height:2; background-color:white"></td>
<td ID="t5base" STYLE="height:2; background-color:white"></td>
<td ID="t6base" STYLE="height:2; background-color:white"></td>
<td ID="t7base" STYLE="height:2; background-color:white;
border-right:solid thin white"></td>
</tr><tr><td HEIGHT="*" COLSPAN="7" ID="tabContents"
STYLE="border-left:solid thin white;border-bottom:solid
thin white;border-right:solid thin white">sample
contents</td></tr></table></div><div CLASS="conts" ID="t1Contents">
<p align="center">Tab1的内容 </p>
</div><div CLASS="conts" ID="t2Contents">
<p align="center">Tab2的内容 </p>
</div><div CLASS="conts" ID="t3Contents">
<p align="center">Tab3的内容 </p>
</div><div CLASS="conts" ID="t4Contents">
<p align="center">Tab4的内容 </p>
</div><div CLASS="conts" ID="t5Contents">
<p align="center">Tab5的内容 </p>
</div><div CLASS="conts" ID="t6Contents">
<p align="center">Tab6的内容 </p>
</div><div CLASS="conts" ID="t7Contents">
<p align="center">Tab7的内容 </p></div>
</body>
</html>

【运行效果】

【难点剖析】
本例的重点是选项卡的样式和切换选项卡的事件。其中使用了“window.event.srcElement”来获取选择的Tab。
【源码下载】
为了JS代码的准确性,请点击:网页中的选项卡 进行本实例源码下载
……