JS代码完成树形目录菜单
【实例名称】
JS代码实现树形目录菜单
【实例描述】
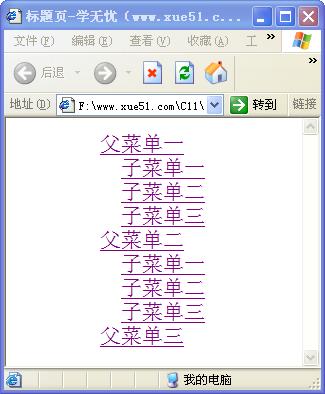
网络菜单有很多种形式,如弹出式、下拉式等。本例介绍树型菜单的制作方法。
【实例代码】
<html xmlns="http://www.w3.org/1999/xhtml" >
<head>
    <title>标题页-本站(www.xue51.com)</title>
<script language="JavaScript">
//判断浏览器的变量
NS4 = (document.layers) ? 1 : 0;
IE4 = (document.all) ? 1 : 0;
ver4 = (NS4 || IE4) ? 1 : 0;
//定义各个层的位置及显示状态
if (ver4) {
    with (document) {
        write("<STYLE TYPE='text/css'>");
        if (NS4) {
            write(".parent {position:absolute; visibility:visible}");
            write(".child {position:absolute; visibility:visible}");
            write(".regular {position:absolute; visibility:visible}")
        }
        else {
            write(".child {display:none}")
        }
        write("</STYLE>");
    }
}
//当菜单打开时,页面上菜单以下的东西的位置顺序往下推,菜单合起时,菜单以下的东西自动上移。
function arrange() {
    nextY = document.layers[firstInd].pageY +
document.layers[firstInd].document.height;
    for (i=firstInd+1; i<document.layers.length; i++) {
        whichele = document.layers[i];
        if (whichele.visibility != "hide") {
            whichele.pageY = nextY;
            nextY += whichele.document.height;
        }
    }
}
//初始化菜单
function initIt(){
    if (!ver4) return;
    if (NS4) {
        for (i=0; i<document.layers.length; i++) {
            whichele = document.layers[i];
            if (whichele.id.indexOf("Child") != -1)
whichele.visibility = "hide";
       }
        arrange();
    }
    else {
        divColl = document.all.tags("DIV");
        for (i=0; i<divColl.length; i++) {
            whichele = divColl(i);
            if (whichele.className == "child")
whichele.style.display = "none";
        }
    }
}
//展开菜单的方法
function expandIt(ele) {
    if (!ver4) return;
    if (IE4) {
        whichele = eval(ele + "Child");
        if (whichele.style.display == "none") {
            whichele.style.display = "block";
        }
        else {
            whichele.style.display = "none";
        }
    }
    else {
        whichele = eval("document." + ele + "Child");
        if (whichele.visibility == "hide") {
            whichele.visibility = "show";
        }
        else {
            whichele.visibility = "hide";
        }
        arrange();
    }
}
onload = initIt;
</script>
</head>
<body>
      <div id="menuParent" class="parent">
<a href="#" onClick="expandIt('menu');
return false" >父菜单一</a></div>
      <div id="menuChild" class="child">
<a href="#" target="_blank" >子菜单一</a><br>
 <a href="#" target="_blank" >子菜单二</a><br>
 <a href="#" target="_blank" >子菜单三</a></div>
      <div id="Menu2Parent" class="parent">
<a href="#" onClick="expandIt('Menu2');
return false" >父菜单二</a></div>
      <div id="Menu2Child" class="child">
<a href="#" target="_blank" >子菜单一</a><br>
     <a href="#" target="_blank" >子菜单二</a><br>
     <a href="#" target="_blank" >子菜单三</a></div>
      <div id="Menu3Parent" class="parent">
<a href="#" onClick="expandIt('Menu3');
return false" >父菜单三</a></div>
      <div id="Menu3Child" class="child">
<a href="#" target="_blank" >子菜单一</a><br>
<a href="#" target="_blank" >子菜单二</a><br>
<a href="#" target="_blank" >子菜单三</a></div>
</body>
</html>
【运行效果】

【难点剖析】
本例中因为没有使用图标,所以显示效果并不是很理想,在实际应用中,可以在节点前使用文件夹图标。本例的重点是对象的“visibility”属性,其值为“show”时显示子节点,为“hide”时隐藏节点。
【源码下载】
为了JS代码的准确性,请点击:树形目录菜单 进行本实例源码下载
……